In my appointments, I recommend that students avoid using online templates and write their CV in Word instead. This makes it easier for applicant tracking systems (ATS) to read, and boosts their chances of getting through that initial application stage.
This is all very well – but how do we go about writing a CV in a word processor? In this blog, we’ll look at four different functions that can improve the readability of your CV. Keep in mind that these functions may also be available in other word processing programmes.
Use columns with caution
Please note: This advice is for how to make columns accessible to real life recruiters. If there is any chance your CV will go through an applicant tracking system first, we’d suggest avoiding columns altogether.
Using columns on your CV can be troublesome for human readers. Because we read left to right in the UK, we’re more likely to focus on the left-hand column. If you choose to use columns in your CV, make your left-hand column larger than the one on the right. You can do this in Word by searching ‘Add or Remove Columns’ in the search bar. Once you’ve added your columns, search ‘Columns Dialogue’ (shown below). This allows you to edit the width of each column.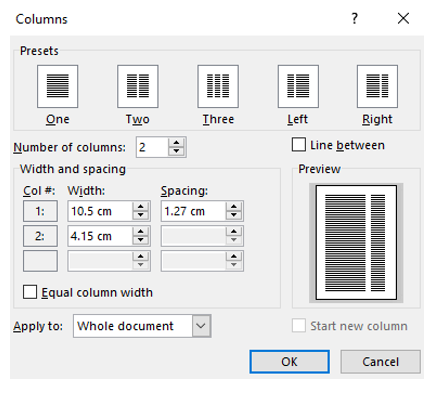 Use the space in the larger left-hand column to emphasise what’s most important, like education and work experience. The smaller column on the right can be used for anything less urgent, like contact information and references.
Bear in mind: Columns can interrupt the flow of a CV, especially if you’ve written a two-page CV (which most employers prefer). Page breaks can’t be avoided and are generally not a problem, but columns make it harder to prioritise what to read and when to turn the page. If you have doubts about the layout of your CV, book an appointment for feedback with an adviser.
Use alignment tabs
Aligning small pieces of text on either side of the page is a great way to save space on your CV. For example, in your work experience section you might include information about the role or organisation on the left-hand side, and the dates you worked there on the right (shown below).

You might use the tab button on your keyboard to align one piece of text on the left, and another on the right, but it’s likely this won’t be recognised by an ATS. And if you use CV360 to generate automated feedback on your CV, it will pull you up on using the tab button.
Instead, you can achieve the same result by using ‘Insert Alignment Tab’. Write your left-hand text as normal, then add the text you want to align to the right. Make sure the text cursor is positioned where you want to split the text, then insert your alignment tab and choose ‘right’ (shown below).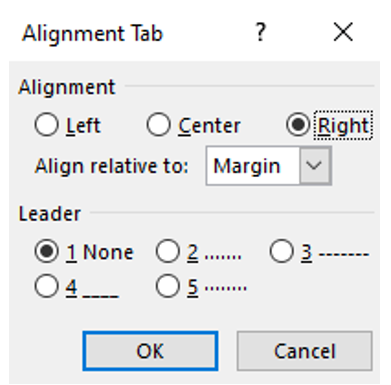
This should allow your text to align on either side without relying on manually inserted tabs. It looks exactly the same, but it won’t trip up an ATS.
Use editor
The latest version of Word has an editor tool which you can find under ‘Review’ on the ribbon. It checks for spelling and grammar mistakes and can also give feedback on your tone, conciseness and vocabulary. The editor score will change depending on whether you set it to ‘formal’, ‘professional’ or ‘casual’, and the suggestions in ‘corrections’ and ‘refinements’ will change too.

What works for a blog won’t necessarily work for a CV, and vice versa. Editor is an excellent tool for picking up on these nuances. Free online tools like Grammarly and Hemingway have similar functions for considering tone.
Use the accessibility checker
Accessibility benefits everyone. Using this tool shows that you are mindful of your CV’s usership, have considered inclusivity, and also taken software like screen readers into account, which can have similar features to ATS.
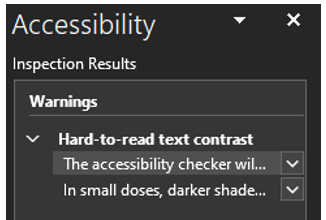
The accessibility checker will also scan your document for hard-to-read text contrast. If your CV is written in black text on a white page, this shouldn’t be a problem. But if you choose to use colour in your CV, it’s worth using this feature to find an acceptable shade. Low contrast, such as red or yellow on white, is difficult for anybody to read. In small doses, darker shades of blue can help your CV stand out tastefully. Speak to an Applications Adviser if you’re not sure.
Final thoughts
These are just some of the ways you can use Microsoft Word – a skill plenty of employers will value – to build your CV. There are modules on My Professional Development and the Microsoft website if you want to further your knowledge of using Word.
Respond